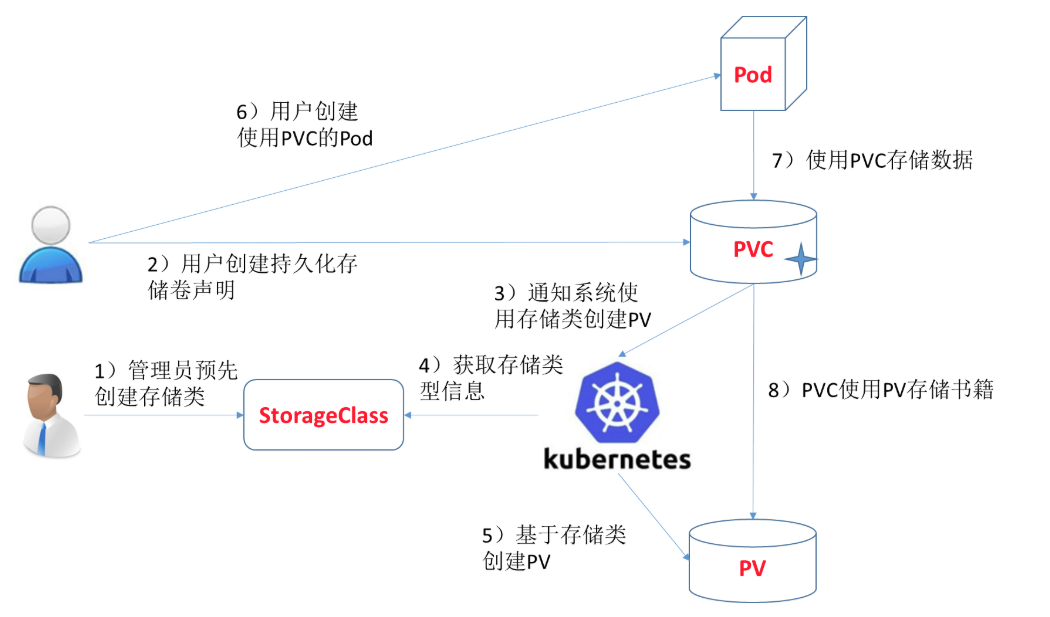
配置 NFS 服务器
yum install -y nfs-utils
echo "/nfs/data/ *(insecure,rw,sync,no_root_squash)" > /etc/exports
# echo /nfs/data  172.26.248.0/20(rw,no_root_squash)" > /etc/exports

mkdir -p /nfs/data
systemctl enable --now rpcbind
systemctl enable --now nfs-server
exportfs -r
#检查配置是否生效
exportfs
# 输出结果如下所示
/nfs/data <world>
搭建 NFS Client
服务器端防火墙开放111、662、875、892、2049的 tcp / udp 允许,否则远端客户无法连接。
- 安装客户端工具
yum install -y nfs-utils
- 执行以下命令检查 nfs 服务器端是否有设置共享目录
showmount -e 192.168.10.11
- 执行以下命令挂载 nfs 服务器上的共享目录到本机路径 /root/nfsmount
mkdir /root/nfsmount
mount -t nfs 192.168.10.11:/nfs/data /root/nfsmount
echo "hello nfs server" > /root/nfsmount/index.html
测试 Pod 挂载 NFS
NFS_IP=192.168.10.11
cat > ./nfs_mount.yaml <<-EOF
apiVersion: v1
kind: Pod
metadata:
  name: vol-nfs
  namespace: default
spec:
  volumes:
  - name: html
    nfs:
      path: /nfs/data
      server: $NFS_IP
  containers:
  - name: myapp
    image: nginx
    volumeMounts:
    - name: html
      mountPath: /usr/share/nginx/html/
EOF

kubectl apply -f ./nfs_mount.yaml
- 在 nfs 服务器上验证文件写入成功
kubectl exec -it vol-nfs -- curl localhost
设置动态供应

创建 provisioner(NFS环境前面已经搭好)
| 字段名称 | 填入内容 | 备注 |
|---|---|---|
| 名称 | nfs-storage | 自定义存储类名称 |
| NFS Server | 192.168.10.11 | NFS服务的IP地址 |
| NFS Path | /nfs/data | NFS服务所共享的路径 |
- 创建授权
cat > nfs-client-provisioner-rbac.yaml <<-EOF
apiVersion: v1
kind: ServiceAccount
metadata:
  name: nfs-client-provisioner
  # replace with namespace where provisioner is deployed
  namespace: kube-system
---
kind: ClusterRole
apiVersion: rbac.authorization.k8s.io/v1
metadata:
  name: nfs-client-provisioner-runner
rules:
  - apiGroups: [""]
    resources: ["persistentvolumes"]
    verbs: ["get", "list", "watch", "create", "delete"]
  - apiGroups: [""]
    resources: ["persistentvolumeclaims"]
    verbs: ["get", "list", "watch", "update"]
  - apiGroups: ["storage.k8s.io"]
    resources: ["storageclasses"]
    verbs: ["get", "list", "watch"]
  - apiGroups: [""]
    resources: ["events"]
    verbs: ["create", "update", "patch"]
---
kind: ClusterRoleBinding
apiVersion: rbac.authorization.k8s.io/v1
metadata:
  name: run-nfs-client-provisioner
subjects:
  - kind: ServiceAccount
    name: nfs-client-provisioner
    # replace with namespace where provisioner is deployed
    namespace: kube-system
roleRef:
  kind: ClusterRole
  name: nfs-client-provisioner-runner
  apiGroup: rbac.authorization.k8s.io
---
kind: Role
apiVersion: rbac.authorization.k8s.io/v1
metadata:
  name: leader-locking-nfs-client-provisioner
  # replace with namespace where provisioner is deployed
  namespace: kube-system
rules:
  - apiGroups: [""]
    resources: ["endpoints"]
    verbs: ["get", "list", "watch", "create", "update", "patch"]
---
kind: RoleBinding
apiVersion: rbac.authorization.k8s.io/v1
metadata:
  name: leader-locking-nfs-client-provisioner
  # replace with namespace where provisioner is deployed
  namespace: kube-system
subjects:
  - kind: ServiceAccount
    name: nfs-client-provisioner
    # replace with namespace where provisioner is deployed
    namespace: kube-system
roleRef:
  kind: Role
  name: leader-locking-nfs-client-provisioner
  apiGroup: rbac.authorization.k8s.io
EOF

kubectl apply -f nfs-client-provisioner-rbac.yaml
- 创建 Deployment
NFS_IP=192.168.10.11
cat > nfs-client-provisioner-deployment.yaml <<-EOF
kind: Deployment
apiVersion: apps/v1
metadata:
  name: nfs-client-provisioner
  namespace: kube-system
spec:
  replicas: 1
  strategy:
    type: Recreate
  selector:
    matchLabels:
      app: nfs-client-provisioner
  template:
    metadata:
      labels:
        app: nfs-client-provisioner
    spec:
      serviceAccountName: nfs-client-provisioner
      containers:
        - name: nfs-client-provisioner
          image: quay.mirrors.ustc.edu.cn/external_storage/nfs-client-provisioner:latest
          volumeMounts:
            - name: nfs-client-root
              mountPath: /persistentvolumes
          env:
            - name: PROVISIONER_NAME
              value: storage.pri/nfs       # 根据自己的名称来修改,与 storageclass.yaml 中的 provisioner 名字一致
            - name: NFS_SERVER
              value: $NFS_IP               # NFS服务器所在的 ip
            - name: NFS_PATH
              value: /nfs/data             # 共享存储目录
      volumes:
        - name: nfs-client-root
          nfs:
            server: $NFS_IP                # NFS服务器所在的 ip
            path: /nfs/data                # 共享存储目录
EOF

kubectl apply -f nfs-client-provisioner-deployment.yaml
quay.io/external_storage/nfs-client-provisioner:latest这个镜像中 volume 的mountPath 默认为/persistentvolumes,不能修改,否则运行时会报错。
- 创建 storageclass
cat > nfs-client-provisioner-storageclass.yaml <<-EOF
apiVersion: storage.k8s.io/v1
kind: StorageClass
metadata:
  name: storage-nfs
provisioner: storage.pri/nfs
reclaimPolicy: Retain
EOF

kubectl apply -f nfs-client-provisioner-storageclass.yaml
Tip
扩展"reclaim policy"有三种方式:Retain、Recycle、Deleted。
Retain: 保护被PVC释放的PV及其上数据,并将PV状态改成"released",不将被其它 PVC 绑定。集群管理员手动通过如下步骤释放存储资源:- 手动删除 PV,但与其相关的后端存储资源如(AWS EBS, GCE PD, Azure Disk, or Cinder volume)仍然存在。
- 手动清空后端存储 volume 上的数据。
- 手动删除后端存储 volume,或者重复使用后端 volume,为其创建新的 PV。
Delete: 删除被 PVC 释放的PV及其后端存储 volume。对于动态 PV 其"reclaim policy"继承自其"storage class",默认是 Delete。集群管理员负责将"storage class"的"reclaim policy"设置成用户期望的形式,否则需要用户手动为创建后的动态PV编辑"reclaim policy"Recycle: 保留 PV,但清空其上数据,已废弃
改变默认 sc
- 查看默认存储类型
kubectl get storageclass
- 标记默认 StorageClass 为非默认
kubectl patch storageclass standard -p '{"metadata": {"annotations":{"storageclass.kubernetes.io/is-default-class":"false"}}}'
- 标记一个 StorageClass 为默认
kubectl patch storageclass storage-nfs -p '{"metadata": {"annotations":{"storageclass.kubernetes.io/is-default-class":"true"}}}'
验证 nfs 动态供应
创建 pvc
cat > nfs-pvc.yaml <<-EOF
apiVersion: v1
kind: PersistentVolumeClaim
metadata:
  name: pvc-claim-01
 # annotations:
 #   volume.beta.kubernetes.io/storage-class: "storage-nfs"
spec:
  storageClassName: storage-nfs  #这个class一定注意要和sc的名字一样
  accessModes:
    - ReadWriteMany
  resources:
    requests:
      storage: 1Mi
EOF

kubectl apply -f nfs-pvc.yaml
使用 pvc
cat > nfs-test-pod.yaml <<-EOF
kind: Pod
apiVersion: v1
metadata:
  name: test-pod
spec:
  containers:
  - name: test-pod
    image: nginx
    volumeMounts:
      - name: nfs-pvc
        mountPath: /usr/share/nginx/html/
  restartPolicy: "Never"
  volumes:
    - name: nfs-pvc
      persistentVolumeClaim:
        claimName: pvc-claim-01
EOF

kubectl apply -f nfs-test-pod.yaml
ll /nfs/data/
最后更新: 2024年12月12日